U Joint Replacement for Camaro and Firebird
After having the distinct pleasure of replacing my 1978 Trans Am u-joints I thought I would write this article to help others not suffer the same pain I went through.
On Second generation F-body cars the u-joints are held in with an internal nylon ring. There is a grove on the inside of the yoke and around the bearing. The nylon is poured through a small hole in the yoke to make the "grip ring". To remove the ring you will need a u-joint/ball joint press like the one at the bottom of the page from Eastwood Tools.
First you remove the drive shaft from the car. To do this place the rear of the car securely on jack stands. MAKE SURE THE FRONT WHEELS ARE CHOKED AND THE CAR IS ON THE STANDS CORRECTLY! I do not want to loose any fellow car enthusiast! Place an oil drain pan under the tail of the transmission. Now mark the relationship of the drive shaft to the rear end. Sometimes this can effect the balance of the driveline. Now remove the four u-bolts from the rear yoke. Pull the drive shaft down from the rear end. Now slide the yoke out of the transmission.
Next you place the yoke in the press so that when you tighten then press down it pushes the bearing into the hole in the bottom of the press. Make sure the bearing is situated so that it does not hit the press itself. The press will be hard to turn then you will hear a "pop". The popping noise is the nylon ring breaking. Once broken the u-joint will come right out.
Now the next step is to clean the yoke and replace your u-joints. Place one bearing cap in about a 1/4 of the way then put the u-joint in. Now place the other cap on and tap them in. The snap rings on the new u-joint will go outside the bearing on the inside of the u-joint.
Do this procedure for both ends of the drive shaft then reinstall the drive shaft as taken out from the car.
Be sure to torque the bolts correctly!
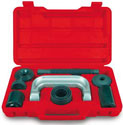 |
Ball Joint - 4WD Service Tool
Ball Joint and Four Wheel Drive Service Tool Kit Remove and install press fit type ball joints, universal joints, and truck brake anchor pins in place on the vehicle. Easier and safer to use than a bench vise because of the wide range of included sleeves/adapters. Set includes a Heavy Duty "C" frame press, 3 receiver tubes (2 3/4" ID x 3" OD, 2 1/4" ID x 2 1/2" OD, 1 3/4" ID x 2" OD), installation and removing adapters, 1pc installing adapter, and complete instructions in a durable blow molded case. Imported. One Year manufacturer's warranty. Eastwood Tools |